During the past few weeks, a lot of amazing features have been integrated to GreenDroid. Some of those features includes item-based ListViews, XML-based ListViews SegmentedBar, etc. Today, I’d like to introduce you with a brand new addition to the GreenDroid library project: the ActionBar and all of its related classes.
Some of you may know, I’m strongly attached to make Android a great mobile platform. In order to that, I think it is compulsory to create user-friendly UIs. I really believe a great Android UI have to be be clear, need to focus on content and should be VERY easy to use … even if the user is my grandfather!
The concept of ActionBar has been introduced with the Twitter application for Android. More recently, we have seen this widget in the Google I/O 2010 schedule application. To sum up, an ActionBar can be considered as an advanced title bar that is capable of:
containing several
ActionBaritems (similar to buttons)being styled so that the general look'n'feel of the application is in accordance with the underlying brand/visual identity
containing a title to show the user a summary of the screen content
featuring several user interaction pattern.

Google recently explained everything about the advantages of using ActionBar in your applications so I won’t spend a lot of time here talking about those key features. If you’re interested in knowing more about the ActionBar UI design pattern, watch the talk given at Google I/O 2010.
Note: As usual, snippets of code below are all extracted from the GDCatalog and GreenDroid projects. Those projects are available on GitHub at the following address: http://github.com/cyrilmottier/GreenDroid
The ActionBar and ActionBarHost classes
As we have previously seen, the ActionBar class represents an enhanced title bar that can be included in your layouts. It supports a large set of features described below:
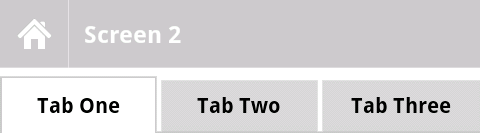
greendroid:title: This is the text that will be used asActionBar’s titlegreendroid:type: AnActionBarcan be of type normal (the default type) or of type dashboard. A normalActionBarlooks like the picture above. A dashboardActionBardoesn’t have a “home” button and display an icon that describes the application : the application drawable. Usually, the dashboard type is used only on the main screen of your applicationgreendroid:dividerDrawable: This is theDrawablethat is used to divide items. By default, the divider is a 1-pixel width translucent whiteColorDrawable
Clickable items can be added to the ActionBar using the addItem(Drawable) or addItem(int) method. Clicks are handled via the ActionBar.OnActionBarListener interface and its onActionBarItemClicked(int) method.
The ActionBarHost is a simple wrapper containing a upper ActionBar (id gd_action_bar) and a lower FrameLayout content view (of id gd_action_bar_content_view).
The GD[List/Tab]Activity
Including ActionBar manually in your layout is a boring task and may be time consuming. To prevent you from doing the same actions over and over again, GreenDroid includes several useful Activitys:
- GDActivity: Hosts an
ActionBarHost - GDListActivity: Hosts an
ActionBarHostand aListView. - GDTabActivity: Hosts an
ActionBarHostand aTabHostas shown below.
How to use the GD-classes
As usual, the GD-classes have been designed focusing on GreenDroid’s development principles: improving easiness, fastness and efficiency!
Applying GreenDroid to your project
I won’t explain how to apply GreenDroid to your project. Indeed, I’ve discussed about that in a very long post that you can find here. Installation instructions are also available in the project’s readme
Make sure you application is a GDApplication
GreenDroid uses information that must be available through the entire application. Some of those information are the application Intent (the Intent that is used when the user pressed the application drawable) or the home Activity class (the class of your main Activity). As a result you need to force your application to be a GDApplication. Simply add android:name="greendroid.app.GDApplication" to the application tag in your AndroidManifest.xml:
The default implementation of GDApplication always returns null values. Changing those values can be done by extending the GDApplication:
1 2 3 4 5 6 7 8 9 10 | |
You can now change the class of your application:
1 2 3 4 5 6 7 8 9 | |
Using the GreenDroid’s base theme
GreenDroid heavily relies on XML resources and especially on styles and themes. In order to use GreenDroid, make sure your application theme inherits from the GreenDroid base theme: @style/Theme.GreenDroid
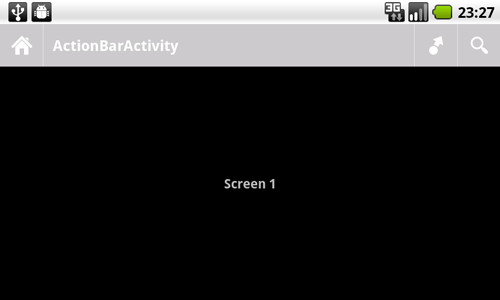
Create your first GDActivity
When using a GDActivity you don’t need to manually add an ActionBar to your layout. The setActionBarContentView(...) methods take your layout and insert it in an ActionBarHost.
Setting the title of the GDActivity can be done using several ways:
- Using one of the setTitle methods
- Adding an extra
Stringwith the keyActionBarActivity.GD_ACTION_BAR_TITLEto theIntentthat launches yourGDActivity - Setting a label to the Activity in your AndroidManifest.xml
Your application is notified everytime the user clicked on an ActionBar item via the onHandleActionBarItemClick(int) method.
Let’s start with an example. The following code is a very simple layout composed of a single TextView that will be used as the content of our GDActivity:
1 2 3 4 5 6 7 | |
The GDActivity code is given below:
1 2 3 4 5 6 7 8 9 10 11 12 13 14 15 16 17 18 19 20 21 22 23 24 25 26 27 28 29 30 31 32 33 34 35 36 37 38 39 | |
The result displayed an screen is shown below
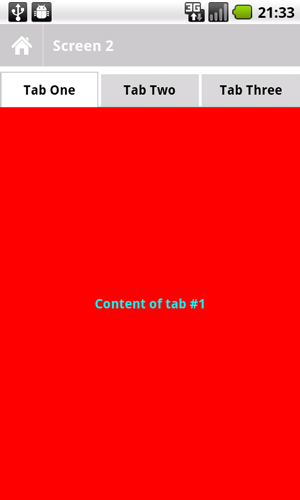
Easily create tabs with GDTabActivity
One of the most useful new GreenDroid’s feature is the ability to rapidly create fancy tabs. The following code shows a demonstration screen containing three tabs:
1 2 3 4 5 6 7 8 9 10 11 12 13 14 15 16 17 18 19 20 21 22 23 24 25 26 27 28 29 30 31 32 33 34 35 36 37 38 39 40 41 42 43 44 45 46 47 48 49 50 51 52 53 54 55 56 57 58 59 60 61 62 63 64 65 | |
Conclusion
One of the biggest problem with previous releases of Android was the lack of great UI/UXs … I know/think Google is working hard on that right now to help developers creating consistent applications. I hope, GreenDroid will be a great solution to that problem and I strongly encourage you to use it as soon as possible : just keep in mind this is a work in progress that may need to be enhanced by developers like you! Happy coding!