Note: For those who forgot to read the first article of the ListView Tips & Tricks series, please go to the first opus and read it. This is obviously not mandatory but you will have a concise explanation about the main purpose of this series of articles!
Note: I do not know how many articles will be written in this series of tips and tricks about the Android ListView widget. In the first opus, I shared a zip file containing the source code of the sample application but I don’t think this is a good idea for future articles. To gather sample codes all together, I have just created a new repository on GitHub that will contain a single application with the examples. You can clone it by having a look at the following GitHub page:
http://github.com/cyrilmottier/ListViewTipsAndTricks
ListViews are commonly used to display a large set of similar data. For instance, the ‘Contacts’ application uses a ListView containing all of your contacts. In this Activity each contact is represented by a single item view. This pattern is quite handy as it shows several contacts on screen at the same time. In other words, it gives the user a large overview of his/her contacts. Unfortunatly, using a ListView widget is not enough… Let’s say you developed a list of contacts where all of your contacts are displayed in a random order. This will obviously prevent you from easily picking one of them and calling him/her. The solution for that is to sort all contacts in an understandable and regular order: the alphabetical order. In addition to the order, it is usually a good practice to section your data in several groups. In the ‘Contacts’ application instance, it boils down to having a section for each letter of the alphabet. Thus, we will have C for Cyril Mottier, J for John Doe and so on …
In this article, we are about to study two different approches that will let you section your ListViews. We will particularly focus on the second one as it is, to my mind, the most optimized and easy to use method. In case you already know how to section your ListViews, I strongly encourage you to read this article because I will give you several optimizations you should use when developing your ListView-based applications
Method #1: Using different types of Views
ListViews and more specifically Adapters can handle several types of Views. If you take a look at the Adapter interface you will notice it contains two specific methods:
getViewTypeCount()which returns the number of types ofViews yourAdapterViewmanages. Most of the time this method returns 1 because all items of theListVieware similar. In this case, by returning 2, theListViewwill handle two types ofViews: the regular itemViews and the separatorViewsgetItemViewType(int)must return an integer between 0 (inclusive) andgetViewTypeCount()(exclusive). The given number expresses the type of theViewat the given position. For instance, we can ensure the returned values are 0 for the regular itemViews and 1 for the separators
I have already written an article dealing with this technique in this blog. As a result, I will not include a sample code here but prefer redirecting you to this page (although this article has been written in French, it contains a very clear sample code).
Advantages
Allows you to manage several types of items
Easy to understand
Disadvantages
Lots of code for almost nothing.
Getting the item at a specific position may be difficult. Let’s say we have [s1, c1, c2, s2, c3, c4, c5] where sN is the N-th separator and cN the N-th contact. The 5th contact is actually stored in the 7th cell of our array of data. This means you can’t access to the N-th contact in your array without knowing how many sections your data contains in the N previous contacts.
Method #2: Leverage GONE visibility
Another way of sectioning a ListView is to use the visibility property of the View class. Android is capable of dynamically measuring and layouting an item View. In the ListView rendering system, those two passes are executed only when a View needs to be displayed. In other words, by default, a ListView manages item Views with variable heights.
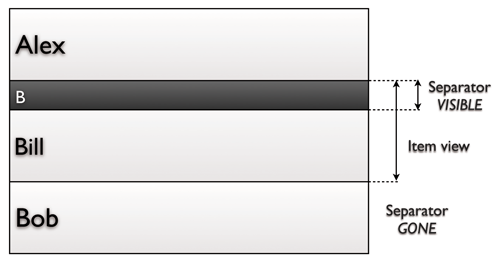
The trick consists on smartly setting the visibility of the separator. The algorithm is pretty simple. A separator must be View.VISIBLE when the item is the first of our Adapter or if the current item is in a different group than the previous one. If none of those conditions are verified, we will set the visibility of the separator to View.GONE. The graphic below sum up the trick:
Disadvantages
- Uses more memory. All of the item
Views instanciates at least oneViewthat may not actually be used/visible.
Advantages
Sectioning may be done “on the fly” very easily
Simple separators are clickable and the performed action is similar to the ‘next’ row. This may be a disadvantage but I prefer considering it as an advantage because it prevents loosing user touches. No matter where the user taps, an action will be performed
getItem(int n)always returns the item at the n-th position in your underlying structure of data. This method works particularly great withCursor-basedAdapters. This is the case when querying aContentProvider.
Example
This demo also contains several optimizations and/or good practices I strongly encourage you to use when developing your ListView-based applications. The short list below contains some of those optimizations with a brief explanation. As you can see, I will not have an in-depth look but rather a brief explanation of the purpose of each optimization. If you don’t understand when and how to use them or simply want a more precise explanation of one of the tricks below, feel free to leave a comment at the bottom of this page.
NotifyingAsyncQueryListener: This class helps us to asynchronously query a
ContentProvider. This is usually a good practice when playing withContentProviders in an asynchronous way as it prevents your query from blocking the UI or even worse firing the devil ANR popup … In the example below, I have created a custom listener based on the API providedAsyncQueryHandler. This class is available since API level 1. However, if you are developing on Android Honeycomb or greater, you should definitely take a closer look at theCursorLoaderclass.ViewHolder: This design pattern eliminates the recurrent calls to
findViewById(int)used every timegetView/bindViewis executed. It consists on getting references to childViews once, storing them as the tag (setTag(Object)) of theViewand re-using those references in thegetView/bindViewmethod code.Itemview state caching: Looking at the previous item to check if the separator needs to be displayed or not may be time-consuming. An easy optimization is to cache the ‘separator state’ of each item
Views. Of course we need to completely flush this cache when the underlying data (here ourCursor) is modified (changeCursor(Cursor)).CharArrayBuffer: Developers are regularly using the
getString()method on theCursor. Unfortunately, it implies creatingStringobjects. These objects are likely to be garbaged once the user starts scrolling. In order to prevent object creation and consequently garbage collection freezes, it is possible to use aCharArrayBufferthat consists on copying data from theCursorto a raw array ofcharthat will be directly used by ourTextViews. Instead of having to create aStringobject, we will hence reuse aCharArrayBuffer.
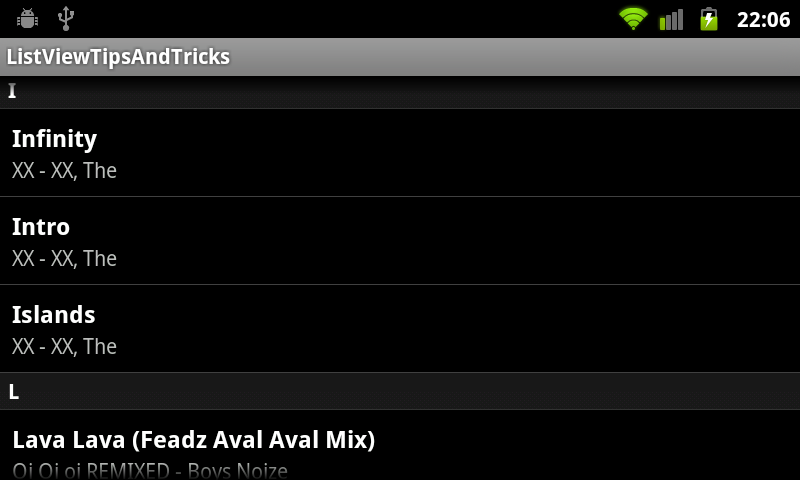
The following example shows you how to implement a sectioned ListView thanks to the second method. The example consists on querying the system for all of the audio files on the device and display a sectioned and alphabetically sorted ListView as shown on the screenshot below:
The layout
First of all, we need to create a custom layout that will be used as the base layout for each cell. We just want to display the title of the song as well as a subtitle. Of course, we also need to add the View that will be hidden/visible depending on the current ‘separator state’ of the cell. As you can see, the following layout is pretty simple and is made of a root LinearLayout containing 3 TextViews:
1 2 3 4 5 6 7 8 9 10 11 12 13 14 15 16 17 18 19 20 21 22 23 24 25 26 27 28 29 30 31 32 33 34 35 36 37 38 | |
The actual code
Now we are ready, we can directly dive into the Java code. Some of you may ask: What? Why are we not creating a custom layout for our screen?. As a matter of fact, we don’t need to create a custom layout for this ListView as the default layout provided by the ListActivity is exactly similar to the one we are looking for. We will simply let the ListActivity do the job of setting the layout to our screen.
The code below is where the magic happens. I will not describe it here but you can look at it carefully and read the comments
1 2 3 4 5 6 7 8 9 10 11 12 13 14 15 16 17 18 19 20 21 22 23 24 25 26 27 28 29 30 31 32 33 34 35 36 37 38 39 40 41 42 43 44 45 46 47 48 49 50 51 52 53 54 55 56 57 58 59 60 61 62 63 64 65 66 67 68 69 70 71 72 73 74 75 76 77 78 79 80 81 82 83 84 85 86 87 88 89 90 91 92 93 94 95 96 97 98 99 100 101 102 103 104 105 106 107 108 109 110 111 112 113 114 115 116 117 118 119 120 121 122 123 124 125 126 127 128 129 130 131 132 133 134 135 136 137 138 139 140 141 142 143 144 145 146 147 148 149 150 151 152 153 154 155 156 157 158 159 160 161 162 163 164 165 166 167 168 169 170 171 172 173 174 175 176 177 178 179 180 181 182 183 184 185 186 187 188 189 190 191 192 193 194 195 196 197 198 199 200 201 202 203 204 205 206 207 208 209 210 211 212 213 214 215 216 217 218 | |
Conclusion
The following code sections a ListView but all separators scroll exactly like the rest of the item View. A great UI enhancement is to make the separator scroll with the item Views until it sticks to the top of the ListView. Thanks to this enhancement, a user always knows in which section he/she is currently looking at. I think I have given a lot of tips in this article so I prefer not talking about it now. I just wanted you to know that’s possible!
That’s all folks! As we have seen, sectioning a ListView can be done very easily without hugely impacting some existing code. A sectioned ListView is also highly appreciated by users. Feel free to reuse these tips and tricks in your applications as they may drastically make your ListViews smoother and more usuable. Happy coding!